Monday, April 30, 2012

Revitalizing a fading manicure with Fantasy Fire

Pin It


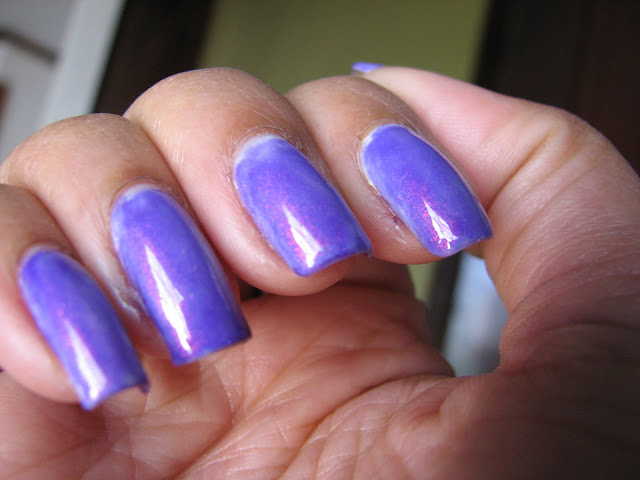
I wore Illamasqua Load with a matte finish and stamped with Revlon Buttercup last week. The polish held up surprisingly well, but started to look a little dull after four days. To liven up my manicure, I painted it with Max Factor Fantasy Fire. I am very thankful to darling Jaime-Lee of Jai Geeks Out for sending me this beautiful polish. Check out her blog. It is a really fun read.

I was hoping that a little of the stamped art on my original manicure would show through Fantasy Fire and as you can see, it did. I wanted to do a paler layer of fantasy fire so that the stamping would show better, but needed three layers of Fantasy Fire to get even coverage.

It is a stunning polish, a sheer purple with shimmer that shines red in most light, but in low light, the shimmer takes on a turquoise green shine.


What do you think of Fantasy Fire on top of Illamasqua Load? What layering combinations do you like for sheer polishes?

I am comparing topcoats over Fantasy Fire and will tell you a bit about that comparison later this week. Until then, why don't you check out the BlogLoveTherapy blog hop?

BlogLoveTherapy

Take care.
~Alexis

Friday, April 27, 2012

Illamasqua Load done matte with subtle stamping

Pin It


Hello, lovelies. Do my nails look like embossed velvet? Because that was what I was going for. Let me quickly tell you about this manicure. I painted a three layer base of Illamasqua Load followed by Essie Matte about you. It took a very long time to dry (but I do usually use INM Out the Door fast drying topcoat). Load's application felt a little sticky or stringy, but I did end up with even coverage. I dinged up the polish a bit before stamping the image. I used Revlon Buttercup on Bornprettystore's m60. I then painted some of the details on my left ring finger with Sonia Kashuk Golden Ticket, Revlon ColorStay Rich Raspberry and Bare Bones. I didn't use a topcoat over the stamping or it would have eliminated the matte finish on the base polish.


I did not take this polish off after four days, but it was starting to look a little tired. Oils from my hands and lotion had eliminated a lot of the matte finish and I was left with more of a satin finish. I ended up with one chip on my left middle finger that was easily patched. I was actually very impressed with how well Illamasqua Load fared. All fingers had only the tiniest bit of tip wear and they still looked quite presentable, especially surprising with such a light colored polish and after using a matte topcoat instead of a more protective topcoat.

Do you wear matte polish? What kind of wear time do you get out of a matte topcoat?

I tried to liven this manicure up by topping it with Max Factor Fantasy Fire. I'll show you the results next week. I also plan to do a comparison between Julep and INM Out the Door fast drying topcoats. One of these topcoats already has a big lead in terms of shine, but that's a topic for later.
The Nail Files

Check out all the manicure fun at The Nail Files-Week 17. Have a good weekend.

~Alexis

Tuesday, April 24, 2012

TARDIS Galaxy Nails

Pin It


Hello, readers. Tell me, are there any other Doctor Who fans out there? I've watched some of the old episodes and some of them are pretty good, but I am addicted to the series that came out in 2005, helmed by Russell T. Davies and now Steven Moffat. The most recent new episode aired on Christmas and the next season isn't due until this fall!

I needed some new Doctor Who and found it through looking at the little TARDIS on my ring finger all week. Strangely, it did soothe my longing. Let me tell you a little bit about the manicure.

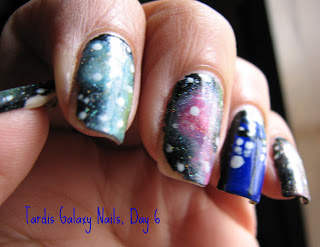
I painted a base two coat of Wet n Wild Black topped with INM Out the Door Northern Lights. I then sponged nebulae on all of my fingers except the left ring finger using Wet n Wild White. I sponged over each nebula using three different polishes per finger and edged each nebula with Julep Melissa and Hard Candy Beetle. I dotted white stars all over my nails. Finally, I topped the entire galaxy mani with another coat of Northern Lights. I love that holographic topcoat! It really was the icing on the cake for the manicure's starry effect. Here is a video so that you can see the flashiness of the topcoat. It was a gorgeous day and it seems that everyone in my neighborhood was mowing their lawns, so I apologize for all the motor noise.

For my TARDIS accent nail, I painted the shape in white and topped it with Revlon Royal. Using a small nail art brush, I painted the windows, sign, and lights on the police box. I used a thin line of Revlon Midnight Affair to outline the corner and roof.


Ugh, was this a chippy mess! By three days in, I had about 5 noticeable chips that just kept getting bigger. If I hadn't worked so hard on the manicure, I would have removed this after four days (five days at the most). Wet n Wild Black will go back to being a stamping or dotting only polish.

I really love galaxy nails. It is a bit time consuming to create the manicure, but I think the results are worth the time investment. If you're interested in trying out galaxy nails, you can check out the same video tutorial that I used. Emerald Sparkled's video shows just how easy it is to create these celestial bodies. Have fun!

Have you done galaxy nails? If you have, I'd love it if you provide a link to photos if they're online. Doctor Who fans, how do you deal with the long absence of the Doctor between seasons?

If you have a moment, you might want to check out the awesome giveaway on Colores de Carol. The giveaway is great, but her blog is fantastic!

I'll be showing you some very subtle stamped nail art on Illamasqua Load next week. Have a good week.

~Alexis

Sunday, April 22, 2012

Earth Day polish swatching and nail art tip

Pin It We polish lovers would be heartbroken to give up our colorful nails. However most nail polish removers contain at least some petroleum based products, so if we can find ways to cut down on the use of nail polish remover a little bit, it would benefit the earth.

One of my favorite nail art tools is a reused cottage cheese or 32oz yogurt container lid. The lids are not accepted by my town's recycling program, so they would end up in a landfill if not reused. They are #2 recyclable, so if I need to use a bit of nail polish remover, the plastic remains intact. I very seldom need to use nail polish remover on the plastic though because it is quite easy to peel dry polish off the plastic.

Reusing these lids is earth friendly in a couple of ways. First, as I mentioned, the lids end up in a landfill if not reused. Secondly, I don't need to paint single use nail art wheels for every swatch I do (I only use the nail art wheel for swatches shared on this blog). I also can easily test out color combinations for nail art without creating a full manicure that might have the wrong shade of base color. I also use a lid under my stamping plates and it dramatically cuts down on post-manicure cleanup.

You can see on my very messy swatching lid that I compared polishes (OPI Designer de Better vs. Sonia Kashuk Golden Ticket) that really don't look much alike, checked polishes for possible layering (Nfu Oh 51 and Max Factor Fantasy Fire over several polishes), and scraped excess nail polish off a stamping plate. You can also see how I created a dry "water" marble on a cottage cheese lid in this post.

In other Earth Day news, I ran in the Envirun 5k race yesterday. It was a cold, rainy morning on Goat Island in Niagara Falls, NY. Even on such a dreary day, I couldn't help but being struck by how amazing it is there. I ran by the rushing white waters of the Niagara River and caught glimpses of the Horseshoe Falls near the end of the race. Living so close to one of the wonders of the world for so much of my life, I sometimes take the beauty of Niagara Falls for granted. I think it is important to remind myself of what I'm trying to preserve on all those days that I don't allow myself the convenience of single serving foods,  or I air dry my hair, or sit in my house during the winter while wrapped up in two sweaters, a blanket, and wearing wool socks on my feet.

Do you have any Earth Day tips to share? Do you find this tip useful? Runners, do you have any tips for me as I begin training for a 10k race this summer?

Have a good day.

~Alexis

Wednesday, April 18, 2012

Stamped art on Nfu Oh 61 and Julep Renee

Pin It


Hello again. Here is another mangled manicure. I was truly smitten with this manicure. I think that Julep Renee is a perfect spring polish. The formula was a little thicker than most, but still super smooth and creamy. I stamped over Renee with Revlon ColorStay Amethyst using bornprettystore's m69. I had some trouble getting the image to pick up and apply completely, but I was pleased with how the two purples complimented one another. The purples brought me right into the springtime mood. I don't have a holographic polish basecoat, so I used essie matte about you as the basecoat. I topped the tip of the nail with Nfu Oh 61. The application was a little streaky and difficult, but I think that it's just a matter of practice to determine how much polish you need on the brush to get even coverage. I then stamped over the join of the purple and holographic polish with bornprettystore's M19.

Here is where I made my mistake. I will not use a topcoat over holographic nail polish again. The manicure looked nice, but would have looked worlds better with the full holographic effect of the polish. As I mentioned in a post earlier this week, topcoat eliminated the purple flash from the holographic polish.

This was definitely a short-lived manicure. After only 4 days, I experienced some significant chipping. I tried to touch up the tips, but the polish just wanted to keep chipping. Normally, when a polish chips so quickly, I don't wear it again except as accents, but Nfu Oh 61 is so spectacular that I will accept it as a one to three day manicure and just enjoy staring at its flashiness for those few days.

What polishes or colors bring your mind to spring? Any favorite holographic polishes?

The Nail Files

Head over and take a look at some of the beautiful manicures at the nail files-week 16.

I'll be sharing my TARDIS Galaxy nails next week. I am in Doctor Who withdrawal right now, so I decided to soothe my longing with some nail varnish therapy. Happy polishing.

~Alexis

Monday, April 16, 2012

How to turn your holographic polish into a flat, boring manicure

Pin It . . . Or "Why I didn't follow the instructions of many wise bloggers who know tons more than I do about getting the most out of holographic nail polishes."

I read it on several blogs. "When using a holographic polish, do not use a topcoat." But then I found a single commentary suggesting that once a topcoat is completely dry, your holographic polish returns to its stunning appearance. Lies!

Two facts about holographic polish that bear repeating: 1. Holographic polish chips very quickly. Do not expect to get a week's wear out of it. 2. Adding a topcoat to holographic polish dramatically decreases the holographic effect of the polish.

I figured, given fact number 1 about holographic polish, that the diminished flash of the polish would be worth it if a topcoat increased wear time. Topcoat didn't add wear time. The polish had chipped on several nails by the end of two days. And the topcoat completely eliminated the purple flash from the polish. It was still pretty, but compared with the beauty of the pure polish, it looked like a flat grey. So, please heed my warning. Enjoy your holographic polishes topcoat-free.

I now want to take a moment to thank two wonderful bloggers for nominating me for "The Versatile Blogger Award." Thank you Ria of rialovespawlish.com and Emma of emmas-advice.blogspot.com for really making me feel the love.

There are a number of great blogs out there and I enjoy all of the ones I follow. Here are a couple that I really love visiting:
Nail Polish Anonymous: She makes me drool over gorgeous indie polishes.
Konad & Me: She never disappoints with her creative stamped nail art and her "eye of the day" pictures are beautiful.
Colores de Carol: Her manicures cover the entire spectrum, from elegant and ladylike to whimsical and fun. Tons of inspiration to be found there.

Have any of you found a good way to increase holo wear time? What are some of your favorite blogs?

I will show you the complete manicure pictured above later this week. Despite it's quick chipping and some other little problems, it has to be one of my favorite manicures so far. I hope you all have a wonderful day.

~Alexis

Thursday, April 12, 2012

Riveting to see The Hunger Games

Pin It


I wore China Glaze Riveting from the Hunger Games collection last week and I have fallen completely in love. I knew that I loved the polish color, but no lie, it was the best applying polish I have used for as long as I can remember. Even with only one coat of polish, my nails were completely coated with no streakiness whatsoever. I did use two coats of polish though.

I would stare at my nails endlessly and got a couple of compliments on the color. This polish had amazing staying power. After four days, I had one tiny chip on my left middle finger and the tiniest bit of tip wear. I considered wearing the polish for several more days, just because it still looked so good. Then disaster struck. I got a crack in my right thumb and bent my right middle fingernail so that it was really weak. I needed to add patches to both nails. Since I was removing polish from both of those nails, I just removed the polish from all the nails. 


I was taken with how much this polish looked like flame and since once again the weather was cool, I built a couple of fires. You can see the gold flecks in the polish are the color of flame while the orange is like the bright burning embers. I love it so much and want to put it back on my fingers very soon.

Now, the movie . . . it was good. My husband said that they could have done without so much "shaky cam," but I tend not to notice that kind of thing. I do think that the story was told better in the book, but I know that every last detail of the book can not be put into a film. I think that the essence of the book was captured well in the movie. I was very happy with the casting with the minor exception of Woody Harrelson as Haymitch. He was good, but he wasn't what I had in mind. I wouldn't mind seeing the movie again, but I am a serial movie spectator, so that's no surprise.

What do you think of Riveting? What are some other polishes that have amazing resiliency? Did you see or read "The Hunger Games?" What did you think?

Next week, I'll be showing off my new Nfu Oh 61 with Julep Renee and some stamped nail art. Until next time, take care.

~Alexis


Wednesday, April 11, 2012

I got polish in the mail today!

Pin It

The weather today is grey and cold, but it is a beautiful day. I got my Julep April Mystery box and my order from Fabuloustreet.com. First, Julep: In my mystery box, I found a nail file, a couple of candies, a bottle of fast drying top coat, a bottle of cuticle oil (which smells lovely with lavender and feminine ylang ylang) and three bottles of nail polish. Gayle is a lovely dark purple; I like it a lot, but I have so many purples that I think this will be a gift for one of my best girlfriends. Kelly is a light pink creme polish. I received Kelly as part of my Julep Maven intro box, so it will be another gift . . . my friends are so lucky today! The highlight of the polishes was Melissa. I've been wanting that color so now I can take it off my nail polish lust list. It is an irridescent creamy colored polish with a sheen of blue-green and pink.


Now onto my order from fabuloustreet.com. The company supplies Nfu Oh polishes. I stalked the website, waiting for Nfu Oh 61 to come back in stock. If you've been yearning for that polish, it is available right now, but tends to sell out quickly. I also bought a bottle of the ever popular Nfu Oh 51. I like how the colors of 51 were captured in the above photos, but the amazing holo effect of 61 did not really show up in these pictures . . . like I said, it's pretty grey here today though, so when the sun is out, I'm sure that the holographic effect will flash like crazy. I think that these have to be the prettiest nail polish bottles I have ever seen. I just want to put them on display.

Did anyone else get the Julep mystery box? What was in your package? Or is everyone rushing over to fabuloustreet to get a great holographic polish?

~Alexis


Thursday, April 5, 2012

Easter Candy Nails

Pin It

This was my designated Easter manicure. I envisioned this as a stripey candy image with little dots that symbolize Easter eggs hidden among the other dots. The problem with this manicure for me, was the green I used for the base color. I used Revlon Minted, which is a lovely color with a somewhat streaky application. Ignoring the streaky application, the problem was that I should have used a different shade of green polish. This was the color inspiration for the manicure.

Looking at the green of this palette, I realized that I should have used a bold, bright green, like Sinful Colors Irish Green. The other colors that I used for the manicure worked fine (China Glaze For Audrey, Sinful Colors Cloud 9, Sinful Colors Unicorn, and Revlon Russet Flicker). I will try the color combination again using Irish Green at some point because I think it would be a really fun manicure.

We decorated eggs this week. Glitter eggs are a mess. They look cool, but I think that I'll only use glitter for fingernails from now on. It was also a bit chilly this week, so I had to build a couple of fires. Here's how the Easter Candy nails fared after six days and some rough work.

The first minor chipping of my nails began about 4 days into the manicure, so for me, that's very good. By day 6, there were a couple of large chips, but overall, the manicure held up very well. I am pleased with Minted's staying power.

On my nails now, after a unanimous poll decision, is China Glaze Riveting from the Hunger Games collection. I plan to see the movie this weekend. I'm probably the last one to read the trilogy, but finished the first book in two days at the end of last month and the second in two days at the beginning of this month. Now, I am very impatiently waiting to borrow the third book. I have to wait until May to borrow it!! This will be a very long month, because I have trouble putting a story down until it is completely over. It feels like I inhabit the story and the emotions of the characters until I finally can release them by hearing their entire story. Does that make sense?

Despite the knots in my stomach, waiting to read the final installment, I am very pleased with the beautiful polish inspired by the books. I keep staring at my nails and I can't wait to show the manicure off to you next week. Until then, take care.

~Alexis

Sunday, April 1, 2012

Longer, More Voluminous Lashes?

Pin It


UPDATE: here
There was a post on Antique-Purple recently about building the health of eyelashes in order to get longer, more voluminous lashes. She suggests using extra virgin olive oil daily on your lashes, applied with either a mascara brush or a cotton ball.

I know that eyelash length is determined primarily by genetics, but I use conditioner on my hair to moisturize it, protecting it from breakage. It makes sense that if you moisturize your lashes, you protect them from breakage too and they might grow a little bit longer. While Antique-Purple recommends using extra virgin olive oil, I think that coconut oil could be just as effective. I already use coconut oil on my hair as part of my beauty regimen and the hair on my head is happier with the addition of coconut oil.

Both olive oil and coconut oil contain vitamin E, but coconut oil is made up of significantly more saturated fat than olive oil, which is why it is solid at room temperature, but it melts very quickly in the palm of your hand. Both oils coat hair and help to seal in moisture.

I will be using coconut oil on my left eyelashes and extra virgin olive oil on my right eyelashes . . .  Looking at these close-up pictures, I'm hoping that those wrinkles might see some improvement, but I'm not expecting it. I used my fat calipers to measure eyelash lengths. My left eyelashes are 6 mm at their longest and my right eyelashes are 8 mm. A followup post will be coming after 3 months of consistent treatments. Wish me luck!

Do you think this will work? Have you heard of any other tips or tricks that work?


~Alexis